Show Posts

This section allows you to view all posts made by this member. Note that you can only see posts made in areas you currently have access to.


Messages - Rapid Roger

Pages: 1 ... 39 40 [41] 42 43 ... 98
601
Ask Steve a question. / Re: Crosscutting BB Plywood
« on: April 09, 2013, 12:41:49 pm »
I agree with Dave.
I use an 80 tooth thin kerf blade and it is fairly new and sharp. Some blades are marked for plywood and usually have a lot of teeth. I have seen as many as 100 tooth blades at Lowe's.
I also recommend a zero clearance insert on the saw. You can make your own insert with 1/2" plywood and if necessary glue shims to the back of it to get it level with the table. (or maybe sand the back if it is too thick)
I have heard of people using tape and scoring the wood as you have suggested but, I've never done it myself. It might help sometimes.
I generally follow Dave's recommendation of keeping the blade low. Just a 1/16" or so above the material. However, I have also read that if you are getting tearout on your wood to raise the blade up as high as it will go so that the teeth are cutting more straight down on the wood and not ripping right through it from the front edge. There is some thing to be said for that too. You might give that a try anyway.
The other thing that Dave brought up is that sometimes it is just the piece of ply that you are using. We get all kinds of plywood from all over the world and you never really know about the quality until you cut it. Generally speaking, the more plys, the better the wood works. However, I once bought a sheet of 3/4" birch (not baltic birch) that had 9 plys in it and after cutting found that it was full of voids and was basically JUNK!  >:(

Rog 

602
Brag Forum / Re: Box splines?
« on: April 07, 2013, 01:27:23 pm »
Roger - I would be interested in your corner spline description. I have done some boxes but not with mitered corners.

Would the spline apply to bigger picture frames as well?


To answer the last question first....
Yes, splines can be done on picture frames and I use them quite often my self. They do add a lot of strength to mitered corners on anything. The extra glue surface as well as the cross grain of the spline itself makes for a very strong joint for miteres. I also use half lap/mitered corners which are a bit tricky to make but, make for "bomb proof" joints on frames.

As to how to add splines to mitered corners on boxes, there is more than one way to skin that cat, and the way I do it is not necessarily the RIGHT  way it is just MY way. They can be done with a router, a router in a  table, or my way, on the table saw as well as with a hand saw and a GOOD eye.  :D
My method requires another jig to be made for the table saw. The jig is as simple as the miter jig that started this whole post.
(I had better interject here and say....Glue up the box FIRST and give the glue time to cure before handing too much and make sure it is good and square before cutting spline slots.)
To get the idea, take your miter jig, stand it on edge so that the legs form a "V" to the saw table...Get the idea? Now build another jig very similar to it only make the legs closer to 12" high (really 8" is enough for most boxes) and 8"-12" long and trim the bottom of the "V" to leave an opening flush at the table surface. Using the saw fence and a few calculations for placement of the splines, nest the box in the "V" at the 45 degree angle and make a cut. OH YEA! You also need to calculate the height of the blade so that you don't cut into the interior of the box but, you do need as much depth as you can get. I find that if I'm using 1/2" side stock, 1/2" blade height is about right. The distance right at the miter will be greater than 1/2" so you will have some meat left for a good inside corner for looks.
The other thing that I think is important is to use a dado blade to cut the slots so that you don't have to move the fence to get a wider cut for the spline. I have a set of "Freud" box joint blades that will make a 1/4" kerf or a 3/8" kerf depending on how I stack them but, the two outside blades of a dado set will get you a 1/4" cut also or you can even stack a few more blades on for an even wider cut for wider splines.
Splines...That is another thing....I like to use contrasting wood for visual appearance (except for picture frames, there I use the same wood so it WON'T contrast) Just rip a strip of the contrasting wood to 1/4" or however wide your slots are and make sure it fits in the miter slots of the box nice and snug and and several inches long. Depending on how many splines you need of course. I sometimes will glue one end of the strip in a slot, and trim it off fairly flush with the side of the box  glue it again in the next, trim and keep on keeping on until all the slots are filled. Or you can cut them into short pieces and glue all of them in at once and then flush trim all the splines at once.If you give the glue just a few minutes to start to set up, you can handle the job in fairly short order without messing it up too bad. Then the next day (after the glue has set up good) the sanding begins!  ;D
Placement of the splines is more a matter of personal taste. I like to use at least three splines per corner. Usually one in the center and one about 1-1/2"- 2" from the top and bottom. I have used as many as six per corner on taller boxes but, it soon becomes too busy and you may as well use finger joints after that point.
I might also add......You will have to make another (or remake) your jig after cutting splines in eight or ten boxes of different sizes as you will wear out the bottom of the jig from using different spacings for the splines..... DAMHIKT  ;D :D ;D.....(Don't ask me how I know that)
I hope this helps you or anyone else that wants to get into making boxes. If you need further explanation don't hesitate to ask me, I'm here to help.

Rog

603
General Scroll Saw Talk / Re: Thank You
« on: April 07, 2013, 11:54:45 am »
You are very welcome. That is why we are here and why this site exists, to help others with various wood working problems.
Over the years I've had a lot of help from other more experienced woodworkers and I'm just trying to repay some dues.

Rog

604
Brag Forum / Re: Made a miter sled
« on: April 05, 2013, 07:05:28 pm »
OH gotcha, so mount a board to the miter gauge make a cut then that will be where the blade will run though right? Is that the what your talking about? I have some scrap I can do that with.

Yea, ya got it! Not really too hard to do. You might want to glue some sand paper to the face of the miter board just to help hold the stock in position and keep it from sliding or moving while making the cuts.
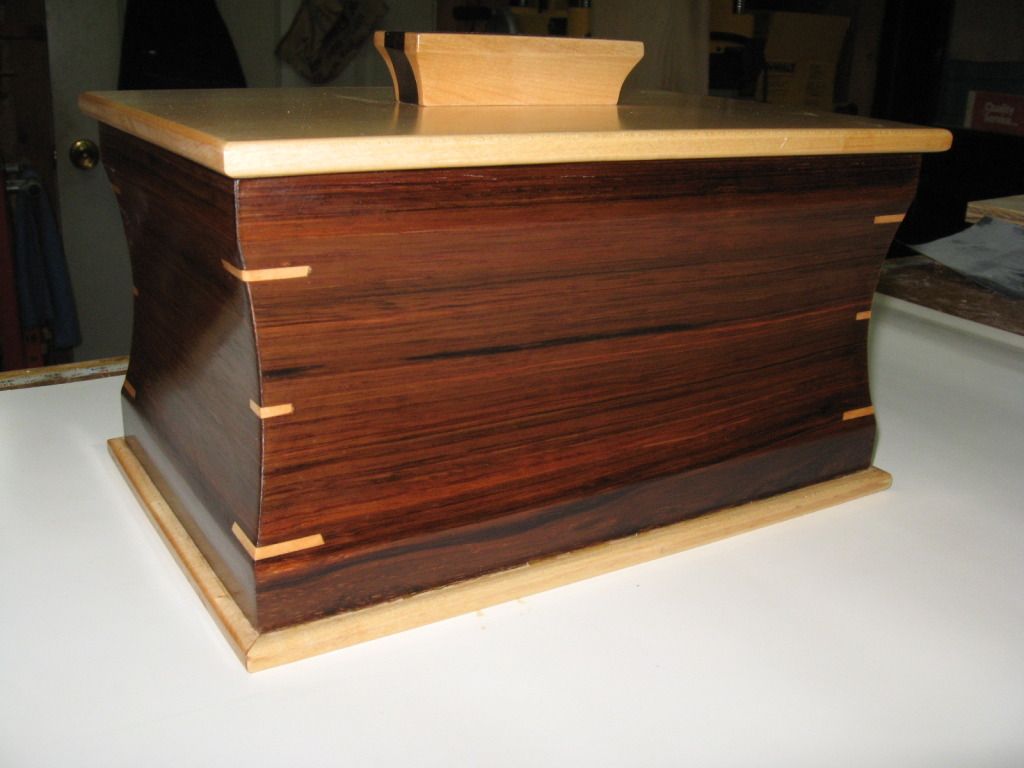
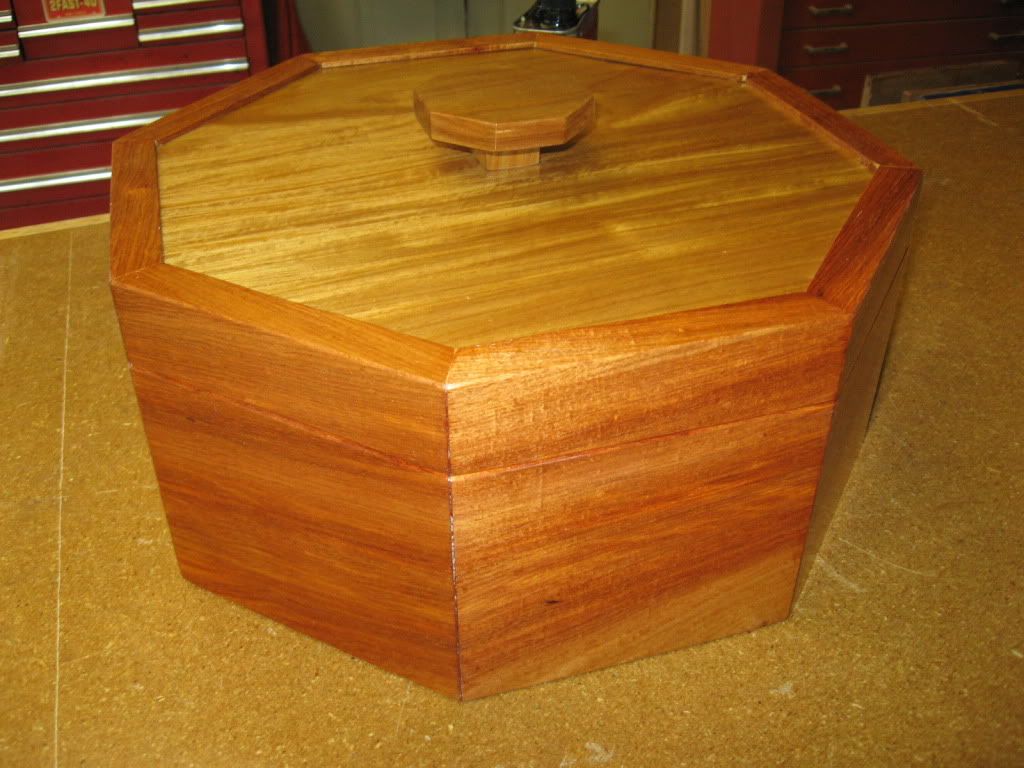
Safe, sane, and sure helps with making small boxes. Boxes are fun to make and the design possibilities are endless.


I sold this one at a charity auction for $75.00. That is part of my problem, SO MANY BOXES and nothing to use them for!


My wife owns this one and won't part with it.......Yet, it sits empty!

Rog


605
The Coffee Shop / Re: If Animals Would Eat at McDonalds
« on: April 05, 2013, 10:25:13 am »
If the animals are eating at McDonalds, why are they trying to kill each other?  ::) :-\ :P :-[

Rog

606
Brag Forum / Re: Made a miter sled
« on: April 05, 2013, 10:19:14 am »
I thought about tilting the blade at a 45 but then how do I know how far to set my fence or where to set the wood on the miter gauge. I guess if I played with it enough I could get it figured out, having this sled is easier for small projects, type of stuff that we do it will work, if need be my dad has a miter saw for bigger stuff.

Forget about the fence! In fact take it off for this operation, it will just get in the way.
Bolt or screw a hardwood board or even a strip of 3/4" MDF to the miter gauge about 4" wide and 24"-36" long. Make sure that it is nice and straight and goes past the table saw blade so that you have a backer board on each side of the blade and make the 45 degree cut right through it. (I forgot to mention, stand the board on edge and make sure the blade is no higher than it needs to be for the box material being used.) Now, if you are feeding the board from left to right, you can clamp a stop at your desired length on the right half of the sacrificial miter gauge (or even just a pencil mark will do) so that you will know where the mating side of the box should be cut for an exact length. Of course you need to also have a stop or pencil mark for the shorter sides also.
As for a miter saw, I have one of those also but, only use it for rough cutting. I don't trust it for an accurate 45 miters and or exact measurements or smooth cuts on small box parts. My 80 tooth cross cut blade on the table saw is the ONLY way to fly!  ;D

Rog

607
Brag Forum / Re: Made a miter sled
« on: April 04, 2013, 10:01:09 pm »
You did a good job on the miter gauge. It is larger than mine, I need to make another closer to the size of yours.
They are a must for picture frames of any size to get a good 45 degree corner but, if you are making box corners more than 2" tall, I find it much easier to tilt the blade to a 45 degree angle and cut the pieces with a standard 90 degree miter gauge.
Give my method a try to see if it works for you. I like it because I can pretty much make the grain match on three of the four corners.
To start, you need to make sure that the blade is tilted to 45 degrees as close as possible. I use a Wixey digital angle gauge but, it can be done with a few practice cuts on scrap wood also.
If I wanted to make a box 6" x 10" x 5" tall for example I would start with a board 5" wide and more than 32" long. In fact, I would probably make sure that it was at least 40" long. I then trim one end at a 45, slide it to the right 10", (use a pre set stop) FLIP IT OVER and make another cut @ 45, FLIP IT OVER and trim in the exact same spot at 45 degrees in the opposite direction (thereby creating a little three sided triangle 5" long that is scrap). Now slide the board over 6", FLIP IT OVER and make the 4th cut. (You now have a long and short side and if you match up the miters made with the 2nd and 3rd cuts you will notice that the grain comes as close to matching as anything you have ever done.) Now keep going by flipping the board over and making the 5th cut in the exact same spot as cut #4 (making another scrap triangle), slide it over to your 10" stop and make cut #6 to make the second long side.  FLIP IT OVER and cut in the exact same place as cut #6 to make another triangle scrap for cut #7. Slide the board over 6" for your final 45 degree cut on the last short side. If you take the time to mark the pieces as you cut them (example.... A-B, B-C, C-D, D-A , ) and reassemble them accordingly all the corner grain will match except corner D-A but, even that one can come out fairly close.
Anyway, I think that this is a much better way for making boxes with mitered corners even though it is long winded and maybe confusing.  ::)
Making splines for the corners is a whole different subject that I could try to explain if you are interested.  ;D

Rog


608
Tutorials, Techniques and Tips / Re: Folks, I need a little help
« on: March 31, 2013, 07:36:00 pm »
You need to sand the table back to natural wood and re coat with the polyurethane a coat or two.
All the sanding sealer (or shellac in my case) does is to fill the pores in the wood so that the pores don't suck up too much stain or finish and cause blotching. Some hard woods don't need to be sealed with anything, but some of the more open pore woods like oak or pine really should be sealed before staining or finishing so that you get a nice smooth color over all.
I know that it seems dumb on my part to cut the shellac 50/50 with alcohol, slop it on, let it dry for an hour or so, and go back and sand the whole thing down and then stain but, believe me it does make a difference.

Rog


Two tables that I made the first of the month for my neighbors. Red oak and all mortise and tenon joints, no metal fasteners, just Titebond hide glue.

Rog 

609
General Scroll Saw Talk / Re: cottonwood
« on: March 29, 2013, 09:47:24 am »
Well, the price seems right!
If it were me, I'd take it (or some of it anyway) and give it a whorl. But then again, I'm one of those people that will try anything twice.  :D

Rog

610
General Scroll Saw Talk / Re: My Next Scroll Saw
« on: March 28, 2013, 06:37:44 pm »
Something is wrong there! Usually the store DOES NOT want to sell the display item because they have to pay an employee to set up another one. I would seriously go back and talk to them about posting a price in public and then hold-up a customer for more because it is in the stock room and NOT set up.
I know that you don't want to upset your "friends" but,I really think your "friends" took advantage of you on the price. Unless you have a HUGE sales tax in your area.
Just my dos centavos worth.

Rog

611
The Coffee Shop / Re: Got me a new to me table saw!
« on: March 25, 2013, 09:25:18 am »
Got more work done on my table saw, got the top cleaned up and sanded and smoothed down. Got my zero clearance throat plate done, got some wheels on it to move the heavy thing around. I am really loving my table saw glad I found it, makes it easier to cut stuff thats for sure.

I also did some hunting, Walmart don't carry it, so went to Lowes and found it, SC Johnson paste wax, 5 bucks for a little can of it. I got home and put some on the scroll saw, and HOLY COW!!! Its like slideing on ice, I put some on the table saw top, as well as the fence, miter gauge rail, and the slots in the saw top. What a difference it makes, why on earth didn't do this from the start when I read about it on here. I have read guys will put it on there scroll saw blades to help, I wonder if it work on the table saw blade to help with wood going through.


Careful about using TOO MUCH wax. Sometimes you don't want things to be too slick.  :o The miter gauge comes to mind. I've even glued sandpaper to the face of mine from time to time to keep the work piece from sliding side to side while cross cutting lumber.  ;) I do like a nice slick table though, especially in the miter slots for smooth movement when using the sled.  ;)

Rog

612
General Scroll Saw Talk / Re: what kind of drill press do you use?
« on: March 24, 2013, 02:38:10 pm »
I have an old bench model drill press that I got from Harbor freight. It was made in Taiwan and is heavy as heck. I bought it in the late 1970's and if I remember right, I paid around $70.00 for it. I have no idea of the brand name (the tag is gone) It has a 6" throat and has never failed me yet!
It does what I need it for and as far as I'm concerned, that is all that is required.

Rog

613
Brag Forum / Re: War & Peace
« on: March 21, 2013, 10:53:23 am »
Excellent project  :)  looks beautiful ,the title is that done by a router?

Mahendra


No, I did it with the scroll saw. I tilted the table to 20 degrees, cut the letters out going in the counter clock wise direction (I did the insides of the "A"s, "R", "P" first by going in the clock wise direction) and stained them with cherry stain before re inserting them back into the cover and recessing them about 1/64" below the surface. Then sanded the back side down smooth where the letters were standing proud. The felt hides the back side from inside the box.
I like working with the router but, I,m not THAT good.  :D

Rog

614
Brag Forum / Re: Dolphin and Coral
« on: March 20, 2013, 03:16:28 pm »
Very creative. I like it a lot. Thinking out side the lines.

Rog

615
Brag Forum / War & Peace
« on: March 20, 2013, 10:41:33 am »
I don't post in the brag section much but, I entered a wood working challenge on another forum and thought some people might enjoy seeing my project.
The "challenge" was to make something using only one board foot of wood. That sounds kind of hard for some people but, a board foot is 144 cubic inches of wood, and if you cut it just right, it can be enough to do a lot with. The item could be made of any wood or even several kinds of wood.
I saw a project on WWMM (Wood Working for Mere Mortals) that Steve did. He made a jewelry box that looked like a book and that inspired me to give it a try. As I was working on a prototype of the box, a friend dropped by and suggested that it would be a good place to keep his "home defense weapon". well, the only thing better than a good idea is TWO good ideas and then this "challenge" came up and as they say, the rest is history!
Being somewhat of a scroll saw user and member of this forum, I thought my project might inspire other people to try new and different things once in awhile.

http://s193.photobucket.com/user/rapidroger/library/War%20and%20Peace


The book measures 7" x 10" x 1-1/2" and totals 105 cubic inches (well with in the limit) and is made of 5/8 birch plywood for the center section, 1/4" cherry plywood for the covers and a piece of solid cherry for the spine. I cut the letters and stained them with cherry stain and recessed them about 1/64" on the scroll saw. I cut the center area by stack cutting the two "page" sections and lined them with peel & stick felt. The spine was drilled for the hinge and then cut down the center in such a way as to form the hinge sections using the scroll saw also. The hinge pin is just two pieces of 1/8" brass rod inserted from each end and plugged.
The title was suggested by my friend who now owns the box/book.  ;D
Hope this gives inspiration to others to try using a scroll saw in different ways.

Rog   

Pages: 1 ... 39 40 [41] 42 43 ... 98

SMF

Teknoromi