Show Posts

This section allows you to view all posts made by this member. Note that you can only see posts made in areas you currently have access to.


Messages - Rapid Roger

Pages: 1 ... 29 30 [31] 32 33 ... 98
451
The Coffee Shop / Re: Does God have a sense of humor?
« on: December 05, 2013, 05:42:35 pm »
He does respond....Sometimes in very strange ways.  ;D

Rog

452
The Coffee Shop / Re: Men
« on: December 03, 2013, 04:36:57 pm »
If a man says something in the forest and there is no woman to hear him, is he wrong anyway?

Rog

453
The Coffee Shop / Re: A little project for you this weekend
« on: December 02, 2013, 07:58:51 pm »
I've seen this table on quite a few videos and am thrilled with it.  :)
My son-in-law wants me to make one for him but, after seeing how it is built....$25000.00 seems like a fair price.  :o  And since I don't have that kind of money I guess he will just have to go on wanting.  :P
I was surprised to find out that there is really not much wood in it!  :P :o ::)

Rog

454
General Scroll Saw Talk / Re: portrait glueing advice please?
« on: December 02, 2013, 07:16:37 pm »
For starters, you need to be sure and have a good wood to wood contact in at least several spots. Example... each corner and at least one place along each edge and one or two near the center. Then you can use good old yeller wood glue like Elmers or Titebond. If you try to glue anyplace with a finish on it, the glue won't hold for very long and in fact may cause the finish to separate from the wood.
I use Titebond glue for everything I do and it is the strongest I can find. With a good wood to wood surface to glue to, the wood will break before the glue will let go.
Hope that helps.

Rog

455
General Scroll Saw Talk / Re: Difference in saws
« on: November 28, 2013, 12:08:30 pm »
I basically believe that it is a poor craftsman that blames his problems on his tools. A lot of very good projects have been made with lower quality tools. However, I must admit that better tools make it easier to accomplish  a project and with somewhat better results.
I started with a el cheapo saw from Ace hardware ($100.00) and learned the basics. Used that saw for two years. (pinned end blades only)
Then I moved up to a Delta saw ($200.00) and thought I had died and gone to heaven!  Spent another two years using that saw a realized the improvement.
After awhile I broke the budget and bought a Dewalt Walt type 2 and have been very happy for the last five years.
I have considered moving on up to a more expensive saw but I think that as long as this one holds up and I'm happy with it, I'll spend my money on wood and blades and grandkids and beer and a lot of other things. :)
So, I would say that you should buy whatever you think would make you happy and can afford and still have money for other things to go along with it......Wood, blades, sanders, finishing supplies, patterns, etc. etc.

Rog

456
The Coffee Shop / Re: I WAS INSULTED !!
« on: November 27, 2013, 06:05:20 pm »
I'm 75% left and 25% right brained......Not sure what that means?......Or what difference it makes.

Rog

457
The Coffee Shop / Re: Dissapointed Cat
« on: November 25, 2013, 09:54:58 am »
THAT WAS FUNNY!!  :D :D :D :D :D

Rog

458
Tutorials, Techniques and Tips / Re: Tight turn tip from Terry
« on: November 25, 2013, 09:51:29 am »
Yep, there is another way and you have almost discovered it on you own!
Just back the blade back into the previous cut a short distance, make a bigger turn and cut on down the next line and so on and so forth until the scrap piece (center section) comes out, go back and cut the 90 degree corner from the other direction to square it up!  ;) This tip works on almost any angle greater than 90.

Rog

459
Brag Forum / Re: Boxes
« on: November 23, 2013, 04:36:04 pm »
No, it is not a glue up, it was one solid board.  The step you see is simply mis-alignment from the rip cut on the table saw. I just decided not to sand it out as it matched the same step on the top and made that glue up a good match. I was afraid that if I sanded the step out of both sides I would never get a nice flat, smooth seam on the outer edges.
I tried to get as invisible seams and good grain match as I could considering the saw kerf area that is missing. I still think that because of the thinner blade and continuous cut of your bandsaw, you could make it look even better no matter the age of your bandsaw.  ;) Invest in a new blade and give it a try, I would love to see your version of it.  ;)

Rog

460
The Coffee Shop / Re: Guess which Countries these photos were taken
« on: November 23, 2013, 11:52:33 am »
Seven out of ten. I still think that the one was in the space capsule!  >:(

Rog

461
The Coffee Shop / Re: You Tell Me 3 0r 4
« on: November 23, 2013, 11:46:41 am »
I guess that is like everything....It all depends on your view point.

Rog

462
Brag Forum / Re: Boxes
« on: November 23, 2013, 11:33:33 am »
I forgot another little trick that I like to use.
The tops (lids if you will) are held closed with magnets. If you look at the picture of the dovetail cutting, you will notice a small hole drilled near the front edge that is where one of the magnets goes. I slid the center of the dovetail section in the box, drilled a 3/16" hole through it and into the front edge of the box. Only drill the hole 3/16" deep in the edge and that is where the matching magnet goes. Just use super glue to keep the magnets in place and MAKE SURE that they attract each other and don't repel against each other.
I get my magnets which are 3/16" diameter and 3/16" from those little refrigerator "push pin" plastic magnets which are available most places and are about the cheapest I can find. You get five sets (ten magnets) per package in matching colors. I just use a vice or pliers to break the plastic off the magnets and I'm "GOOD TO GO!  :D
The cool part of this is when you close the box and get down to about 1/2" the magnets take over and snap the lids shut like magic! And they hold the lid closed for normal use you just have to push on the back edge of the lid to slide it open again. The grandkids really love that part when the lid goes "SNAP!"  :D :D :D
Just another crazy idea from a crazy old man.  ;)

Rog   

463
Brag Forum / Re: Boxes
« on: November 23, 2013, 10:57:48 am »
Good project. Like the 15 degree dovetail. How big was the starting block & what was the finial dimensions?  What did you use to cut the "top" and "bottom" off? Thanks for the detailed pics.

When I started, my board was 3-1/2" x 5" x 45" long. I used the table saw to cut five pieces for the boxes. The pieces vary in length from 7" to 8" in length because I had to avoid some knot holes and drilled holes that were already in the board from previous use.
I used the table saw again to cut the tops, dovetail piece, center section, and bottom off of each block. Four pieces all together (be sure to mark each piece in order to reassemble them for grain match) there were three pieces 3/8" thick for the top, dovetail piece and bottom and that left a 2" thick center section after counting the kerf of the saw blade. I had to run the blocks through the saw and then flip it over and make another cut to get through the 5" wide cut. Obviously a band saw would have a much better tool but, I don't have one.
As you might guess, the 2" thickness of the center fairly well maxed out the scroll saw! By drilling a 3/4" hole in each corner it made it much easier than trying to follow a curve at the corners.
Before anyone asks...I used an Olson FR408TW blade which has a .080 width and a .018 kerf thickness with 7 TPI to cut the center section out and a Flying Dutchman FD-SR No 3 for the dovetail cut and the inlay on the names.
The final dimensions of the largest boxes (there are two) Is 5" wide x 8" long x 3-1/8" deep give or take a bit of sanding.  ;D
Hope that helps.

Rog

PS. The inside dimensions are about 4-1/4" wide (3/8" walls) x 7" long (I left 1/2" on the front and back because end grain tends to break easily) and 2" deep more of less.

464
Brag Forum / Re: Boxes
« on: November 22, 2013, 10:04:23 am »
Nice work, Roger,
Can you explain how you cut the sliding dove-tails on the scroll saw, please?
Maybe I can learn something! LOL
Thanks and God Bless! Spirithorse

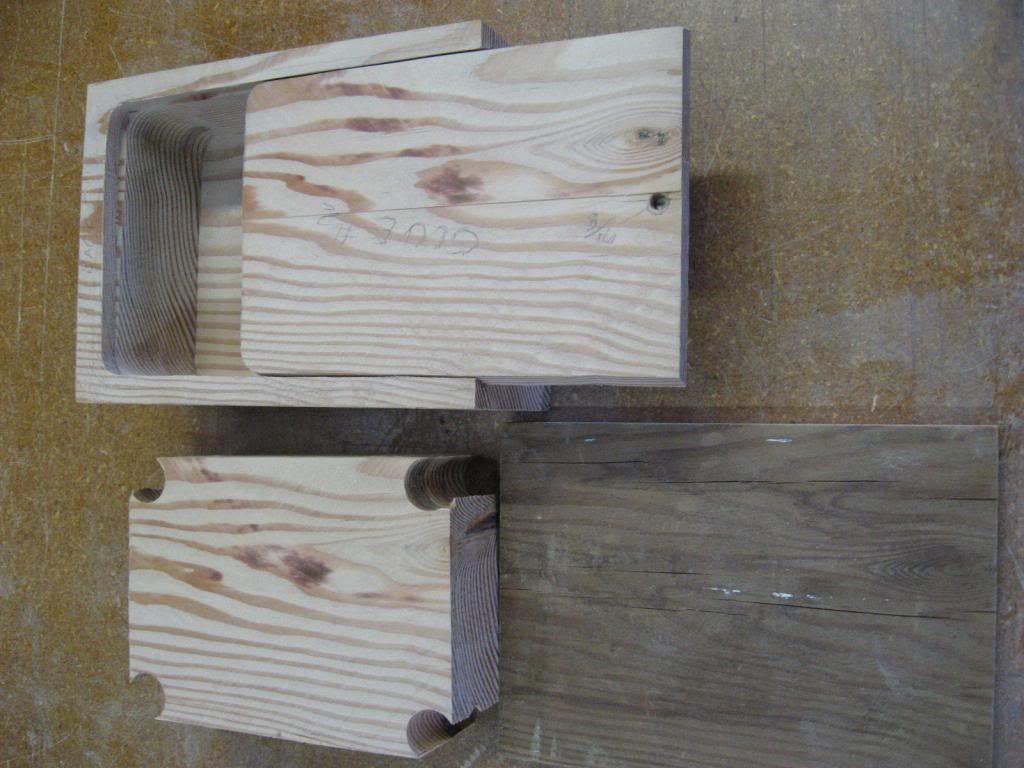
No problem about explaining the dovetail process....As I said, I have pictures.  ;D
The top of the box is actually two pieces which are glued back together after cutting the dovetails. Using the lower (inside) part you just tilt the table to around 15 degrees and cut a large squared off U shape out of it. The inside of the U is glued back to the outer top piece and the outside of the U is glued back to the sides of the box.
Note that the actual top (outside part) is in the lower right part of the picture.


You want to make sure that you leave a bit of edge on the sides and that the two pieces fit and slide easily before gluing the outer top to the center section.
Does that explain it enough? If not, I'll try to explain it further.

Rog

465
Brag Forum / Boxes
« on: November 21, 2013, 05:08:26 pm »
Not a normal scroll sawing project I know but, this is the type of thing that I enjoy making.
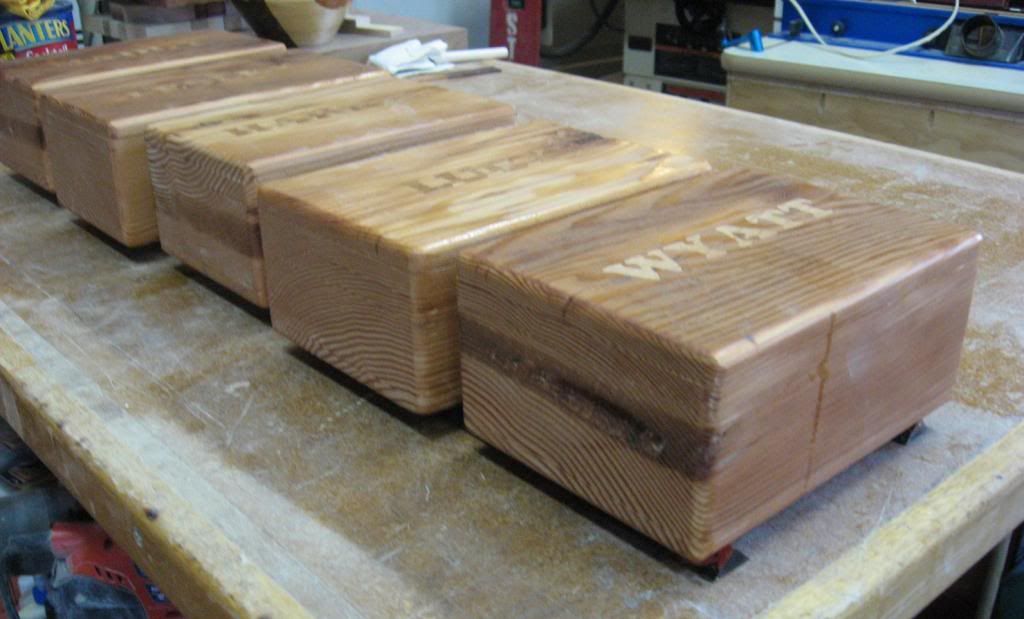
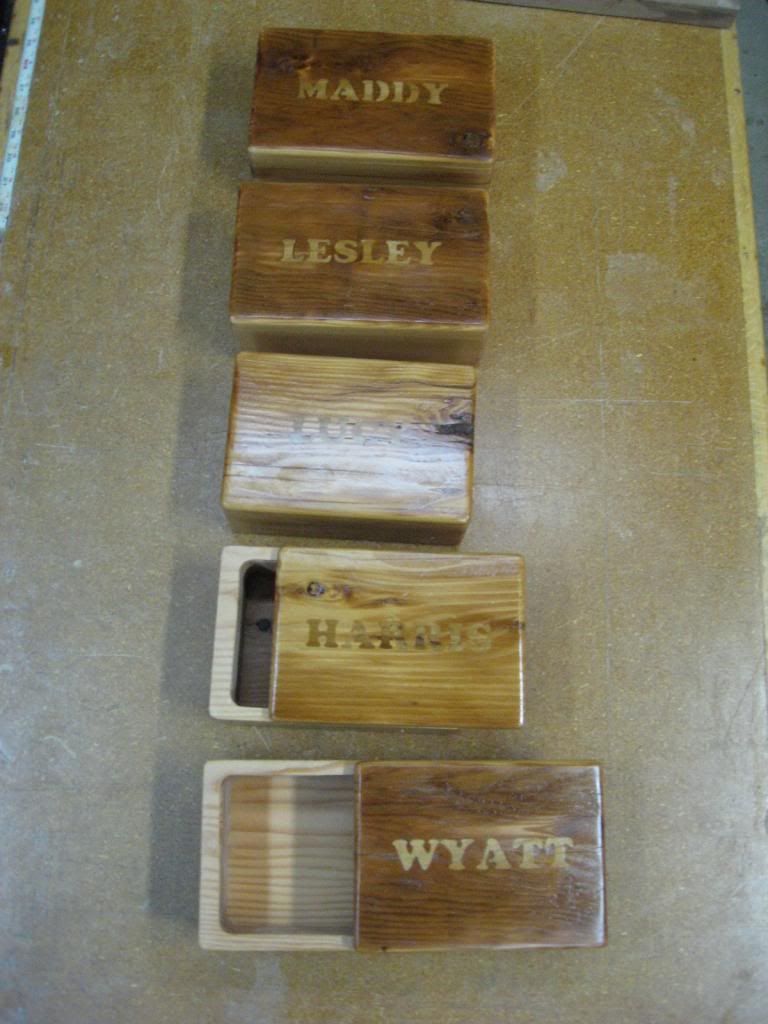
They are boxes for Christmas gifts for my grandchildren. I cut all five boxes out of one large board that measured 3-1/2" x 5" x 45" long. Granted, most of the initial work was done on the table saw but, I cut the centers out with the scroll saw and of course the inlayed names on the tops were cut on the scroll saw as well as the bevels for the sliding dovetails on the lids.
I pretty much left the rough finish of the original board in tact on purpose  and use some cherry scraps for the letters for contrast.
Hope you enjoy something different from time to time. Feel free to ask any questions you might have.
I took step by step photos which of course as you know, "A picture is worth a thousand words".  :)


Rog


Pages: 1 ... 29 30 [31] 32 33 ... 98

SMF

Teknoromi