Show Posts

This section allows you to view all posts made by this member. Note that you can only see posts made in areas you currently have access to.


Messages - Rapid Roger

Pages: 1 2 3 [4] 5 6 ... 98
46
General Scroll Saw Talk / Re: dust extraction
« on: February 06, 2017, 11:36:06 am »
I used a 20" square box fan and mounted a furnace filter to the back of it. I turn it so that it blows away from the saw and sucks "most" of the dust away. It needs to be about 3 foot (or less) from the saw to be effective but, that makes it easier to turn off and on anyway. It is fairly quiet and has three speeds for the desired dust removal.
Hope that helps or at least gives you an idea or two.

Rog

47
General Scroll Saw Talk / Re: Steve Good clock question
« on: February 06, 2017, 11:27:58 am »
Drill a 3/8" hole in the backer at the center of the clock and use a pencil or dowel to push it out when necessary.

48
Pattern Requests. / Re: Salt and Pepper Shaker Patterns
« on: January 25, 2017, 12:51:20 pm »
preztoy,
I am always happy to help out anyway I can however, I don't have any patterns for those. I made them 7 years ago for starters and I made my own patterns for a onetime use only.I can tell you HOW I made them however.
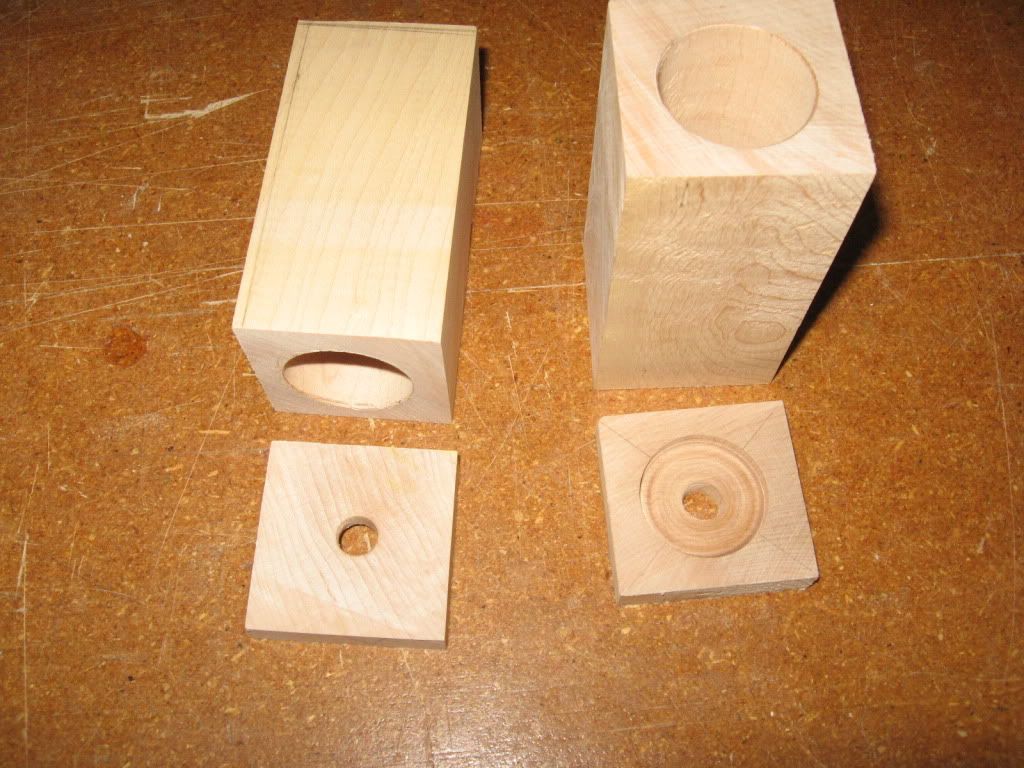
I started by using some 1-1/2" square blanks about 4" tall. Using a table saw I sliced off about 3/8" off of each end. Then I drilled a 1" hole down the center of the largest piece and a 3/8" hole in the bottom piece. I re-glued the top and bottom pieces back on the center (larger) piece so that it looked like the original blank but, was hollow.
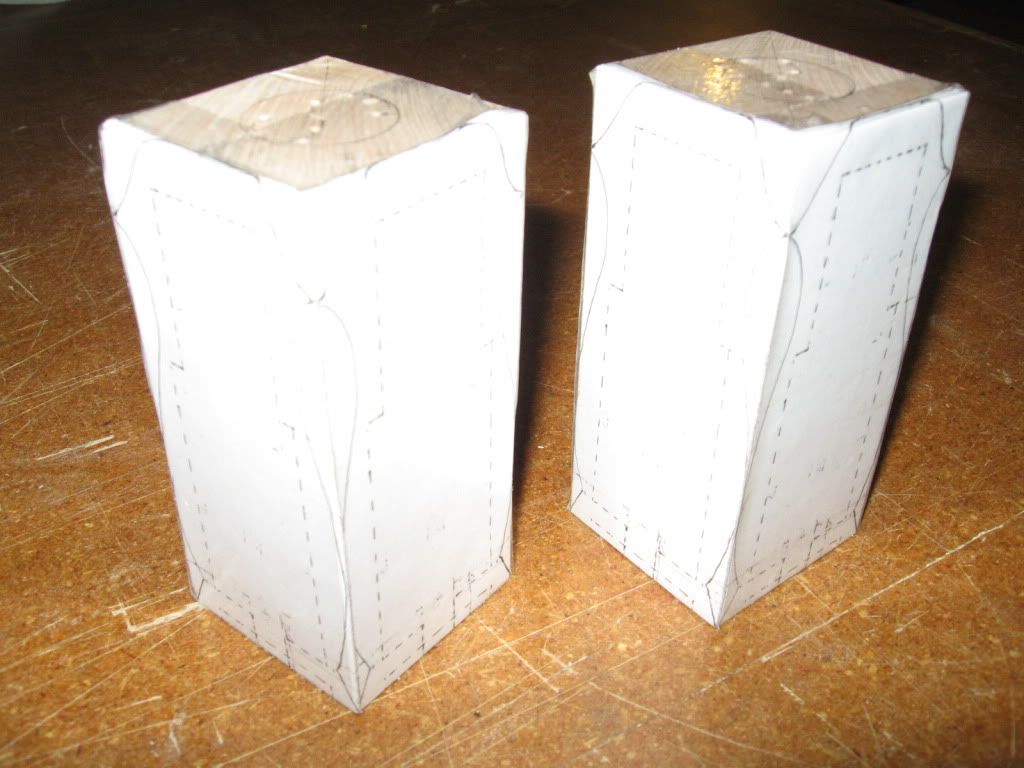
I drew my own patterns on paper carefully using the measurements of the blank and keeping in mind that there was a 1" hole in there :) I made the pattern to cover two sides of the blank after being folded in half to form an L shape. Then cut them out as you do with a 3D piece.
You can tape the "drop" pieces back in to keep everything square for cutting the in the other direction.
Then drill small holes in the center of the top piece (so the salt can come out :) ) Sand, finish and add a cork for the bottom filler hole.
Nothing to it.....Plan on making a bunch of them. As I said the possibilities are endless and EVERY ONE OF THEM is a bit different making them truly "One Offs".


Hope that helps you a bit.
Rog

49
Pattern Requests. / Re: Salt and Pepper Shaker Patterns
« on: January 24, 2017, 11:05:26 am »
Here are some salt & pepper shakers I made way back in 2010. My own design but, the possibilities are endless.


Yes, the last one is my favorite wood...PLY! :)

50
General Scroll Saw Talk / Re: Losing my grip
« on: January 24, 2017, 10:53:09 am »
Just as another suggestion.....Try those rubber fingertip things that people shuffling through pages of paper use. I'll bet you could get a box of them from an office supply store at a reasonable price. :)
(no personal experience however)

51
Ask Steve a question. / Re: Do know what to call it
« on: January 17, 2017, 11:48:28 am »
I do that intentionally when I make inlays. :)
Loosen the table tilt knob, use a credit card as a square to make sure the blade and table are 90 degrees and re-tighten the knob securely. Either forget about the degree gauge or adjust it buy re-setting the little pointer.
You also want to check the blade and table from the back and front side of the blade. You can adjust that with shims under the table hold down bolts or by filing an elongated hole in the back table support. This is seldom necessary however..... You never know, and that knowledge may help on down the way. 
Now the make sure the blade is 90 degrees buy using a thicker piece of wood (1-1/2" or so thick) and cut a straight line into it about 1" or so. Now back the blade out of the cut, turn the wood around and put on the back side of the blade and see if the blade will slide back into the cut from the other side. If it works, Bob is your uncle and if not, START OVER again, you goofed. LOL
HTH.

52
Ask Steve a question. / Re: 3d racechaim
« on: January 16, 2017, 12:33:58 pm »
If you have any 3/4" thick wood at all, your in business!
Say you have a piece of 3/4" x 4" about 12" long, you can cut your blank (and many more) out of that.
Just use a heavier (#7 or #9) blade and draw a rectangle 3/4" x 5" in one corner and cut it out of that board on your scroll saw.
I know that you are going to say "But, I can't cut a straight line" however, that doesn't matter because you are going to cut your 3D pattern out of it anyway so who cares? :)
If your are looking for a certain wood to use, you can buy what ever you want and not worry about exact dimensions to start with. You could even cut it out of a 2" x 5" piece if necessary.
Just trying to help a bit.

53
Tutorials, Techniques and Tips / Re: Hand cramp
« on: January 12, 2017, 05:38:57 pm »
I don't mean to be a total Yahoo but I must ask this question.....
Because it has happened to me and all of us at one time or the other.
Are you putting the blade in correctly? If the teeth are pointed up, they will try to pick the wood up off of the table. Needless to say the fewer (more coarse) teeth there are the more effect the up stroke has.
As I said, I don't mean to be a smart @$$ but, stranger things have been known to cause frustration. Like buying left hand drill bits with out realizing it. :)

54
General Scroll Saw Talk / Re: Trivets and wood
« on: December 07, 2016, 12:24:03 pm »
It doesn't matter.
In case you don't know my attitude....."I'll do anything twice".
What kind of wood do you have now? Use that first.
Should you stain it? Would you like to stain it? OK then, stain it.
Are they to be used? Are they just decorative?
You will never LEARN anything for sure if you don't just try it TWICE! If it doesn't work then don't do it again.
Your imagination is the best tool in your shop and you just need the nerve to try anything. You don't need the approval of me or anyone else.
I know you just want advice on what to do...Well, that is MY advice.

A man once told me that I could never make old plywood look good.....


55
The Coffee Shop / Black Friday
« on: November 26, 2016, 11:59:34 am »
I saved a lot of money this "Black Friday".....I didn't buy a darn thing. :)

56
General Scroll Saw Talk / Re: Foot switch
« on: November 21, 2016, 09:51:42 am »
I sit on a tall stool and have the dead mans switch on a piece of 2 x 6 about 18" long as a "platform". It works well but, sometimes slides around and if I was as smart as I am old, I would just screw the switch to the board and be done with it! However my laziness overwhelms my brain. :)

57
General Scroll Saw Talk / Re: baltic birch plywood
« on: November 10, 2016, 12:40:34 pm »
 Generally speaking.... yes.
The thing about Baltic birch is it has more ply's in it and no voids. Count the layers on the edge, in a given thickness there will be more ply's in Baltic birch than other types of plywood. In 3/4" for example, most kinds will have 7 or 9 layers and Baltic birch will have 13! The thinner wood of course will be different. In 1/8" there may be only 3 layers in other wood and Baltic birch will have 5. (Please note that ALL plywood has an odd number of layers)
Voids are another thing to watch out for in other types of plywood, Baltic birch will have VERY FEW if any in it  on any thickness.
A few years ago, I found an OLD (1970's I think) piece of 3/4" plywood with 7 layers and NO voids which is VERY rare these days. It made some beautiful vases and bowls. If you should run across some, KEEP IT! It will require some sanding on the surfaces but, the edges can create some beautiful patterns.


58
General Scroll Saw Talk / Re: baltic birch plywood
« on: November 06, 2016, 01:13:02 pm »
Sometimes you can find Baltic Birch ply at a hobby shop in smaller sizes (12" x 12" ) and various thicknesses.
And of course it can be had at most mail order places that cater to scroll sawyers. But, it is fairly hard to find in larger sizes like 5' x 5' anyplace but larger lumber supply house who cater to the fine wood working crowd.

59
General Scroll Saw Talk / Re: drilling a hole
« on: November 04, 2016, 10:09:29 am »
In addition to a backer board try a needle point bit. Regular metal drill points bullnose there way through the material. Needle point drills like forester bits cut the outer diameter first before cleaning out the hole. But even these bits will chip out the bottom if dull, forced aggressively, or not held down firmly enough. I try to always try to have a sacrificial board attached to my work so I can not worry about bottom chipping. Good luck. Cheers Brian

I think the "needle point" bits that you refer to are called "BRAD POINT" bits and work the best for all wood working projects.
On the larger FORESTNER bits, I drill ALMOST all the way through and then when the lead point breaks through the back, turn the board over and drill back through using the small hole as reference to eliminate chip-out of the wood. Makes for a nice clean hole from either side. I do the same when using hole saws. I use both styles of bits on the drill press only.
BUT, for most scrolling type work (I'm thinking of fret work) a much smaller hole is required. As small and smaller than 1/16" and even down to numbered bits, there is not much option, and that is where the backer board is a must .

Rog

60
General Scroll Saw Talk / Re: drilling a hole
« on: November 03, 2016, 07:06:10 pm »
A lot depends on the size of hole and thickness of material but, for the most part, "sawdust703" hit the nail on the head! :)
A backer board and a bit less pressure will solve most problems with hand held drill or drill press either one.

Pages: 1 2 3 [4] 5 6 ... 98

SMF

Teknoromi