Show Posts

This section allows you to view all posts made by this member. Note that you can only see posts made in areas you currently have access to.


Messages - Rapid Roger

Pages: 1 ... 23 24 [25] 26 27 ... 98
361
Brag Forum / Re: 3d puzzle fish
« on: March 26, 2014, 10:02:09 am »
Dude, you are like lightning!  Here I am, posting about trying it this weekend and you already have one served up on a plate!   ;D  Nicely done, too.
Becky there fast to make like 15-20 mins or so.i cut out 4 of them but the first 2 didn't turn out so good.just couldn't get then knack of drawing them right but with the pattern stuck on them there a breeze. 


Newfie is right. It took me three times longer to post the tutorial than it took to cut two puzzles!  :D :D :D

Rog

362
The Coffee Shop / Re: Someone
« on: March 25, 2014, 10:24:35 pm »
Got my first one done early this afternoon. Been shooting toothpicks all over the shop.  ;D

Thanks for  the video link.  ;)

Rog

363
Brag Forum / Re: An old project
« on: March 25, 2014, 11:59:20 am »
That is the pattern I used to get started with allright.  8)  After reading the instructions shown here, I realized that I NOW cut them completely BASSACKWARDS!  :o  :P  If you look at my tutorial you will see what I mean.  :)
Guess it really doesn't matter as long as it all ends up in the same place right?  ;D Just goes to show you there is NO completely right or wrong way to do things.  :D
I would think the bandsaw would present a real challenge compared to a scrollsaw but, that is just because I have a scrollsaw and don't have a bandsaw.  :D ;)
Anyway thanks for finding the pattern and posting it xuryl!  ;)

Rog

364
Brag Forum / Re: An old project
« on: March 24, 2014, 11:16:14 am »
Hey ya'll,
Check out the Tutorial, Techniques and Tips section. I just posted some pictures and a bit of an explanation of how I cut these fish.
Barry is right, it is the peg that forms the eye that holds them together. Just press and pull the peg out and it will come apart, so that means NO GLUE REQUIRED!  :D :D :D

Rog

365
Tutorials, Techniques and Tips / 3D, puzzle, fish, key chains
« on: March 24, 2014, 10:52:37 am »
OK, I'm going to try to post a tutorial on how I make these "interesting" key chains.
I apologize for the pictures as some of them are not very clear but, they may help understand the process.
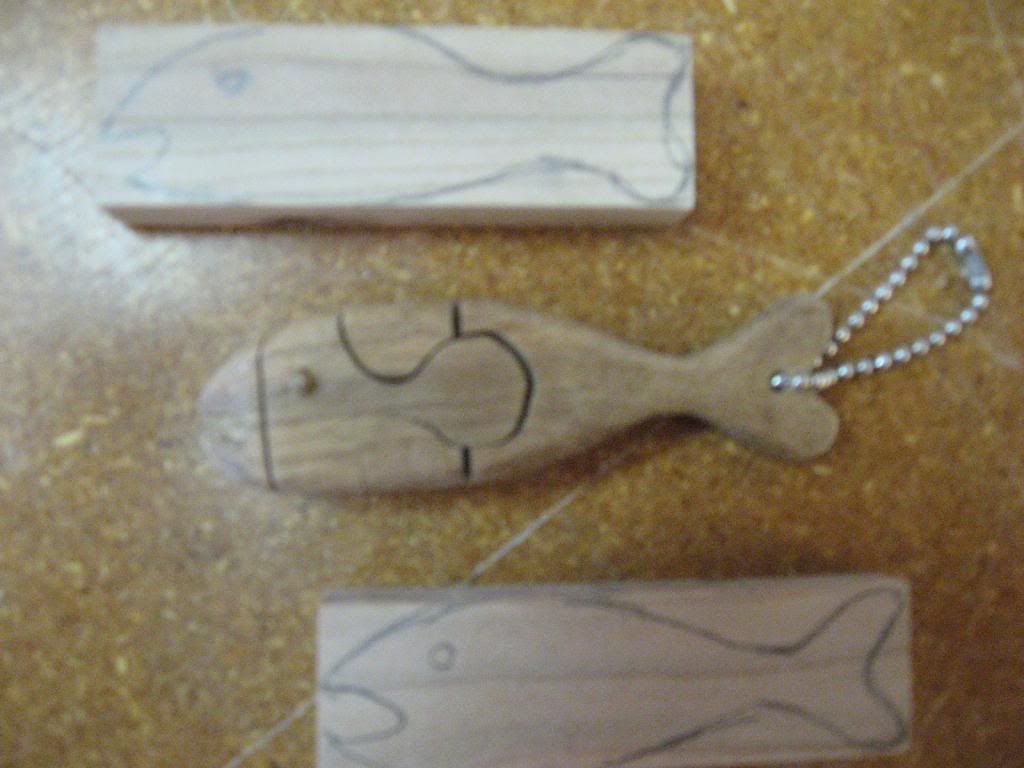
I had a pattern originally but, I found it easier just to draw directly on the wood and cut from there.
DON'T SAY "I CAN'T DRAW A STRAIGHT LINE." There are very few straight lines in them and besides every one of them will be a little different and that is the really cool part of them!   ;D 
You can use any hard wood you want to (that is another cool part) but, plywood is out of the question. Don't even try it! B. T. D. T. and got the T shirt.
I use both 1/2" and 3/4" thick wood but, almost any thickness will work. It is not a large piece of wood, I usually make them about 1" x 3" but again that is not important. Just don't make it too big or thick that it is clumsy for a pocket or purse.


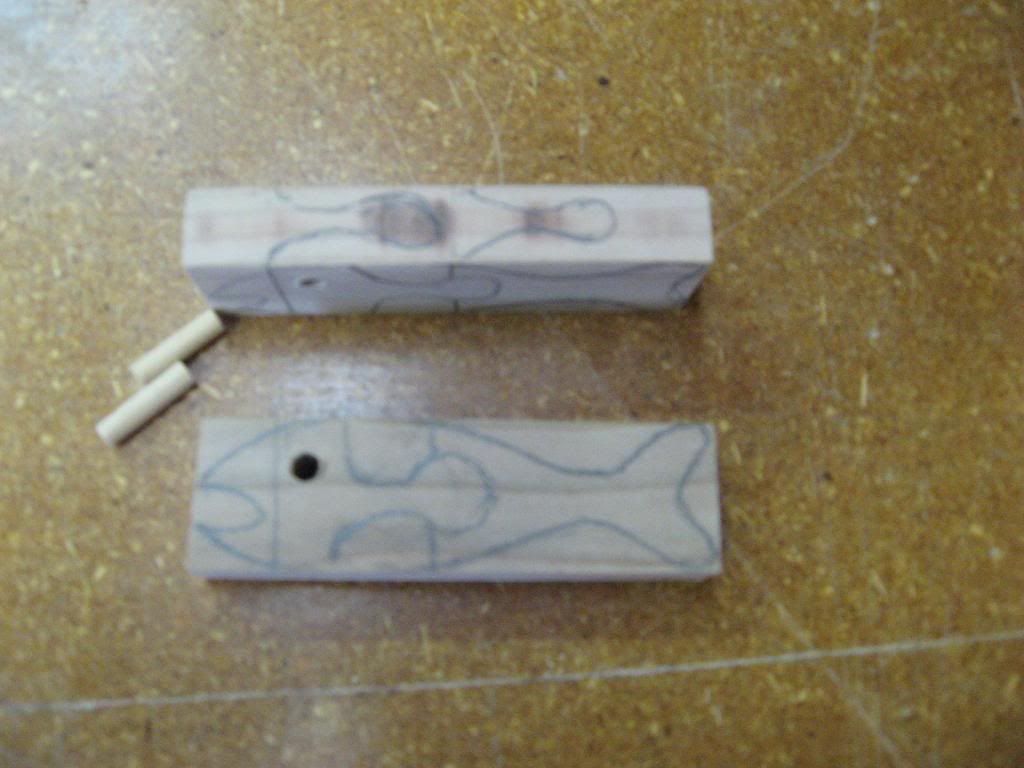
Cut peg and drill eye hole so that it is a PRESS fit. This is important for holding the whole thing together. Draw two jigsaw puzzle shaped pieces on the top.


Cut the shape of the head from the front first and then the first puzzle piece from the top. Be sure to start the cut from the top BETWEEN the mouth and eye.


Now cut the second segment (which contains another puzzle shaped piece) from the front. Start this cut in an area that will trap the shape you cut from the top.


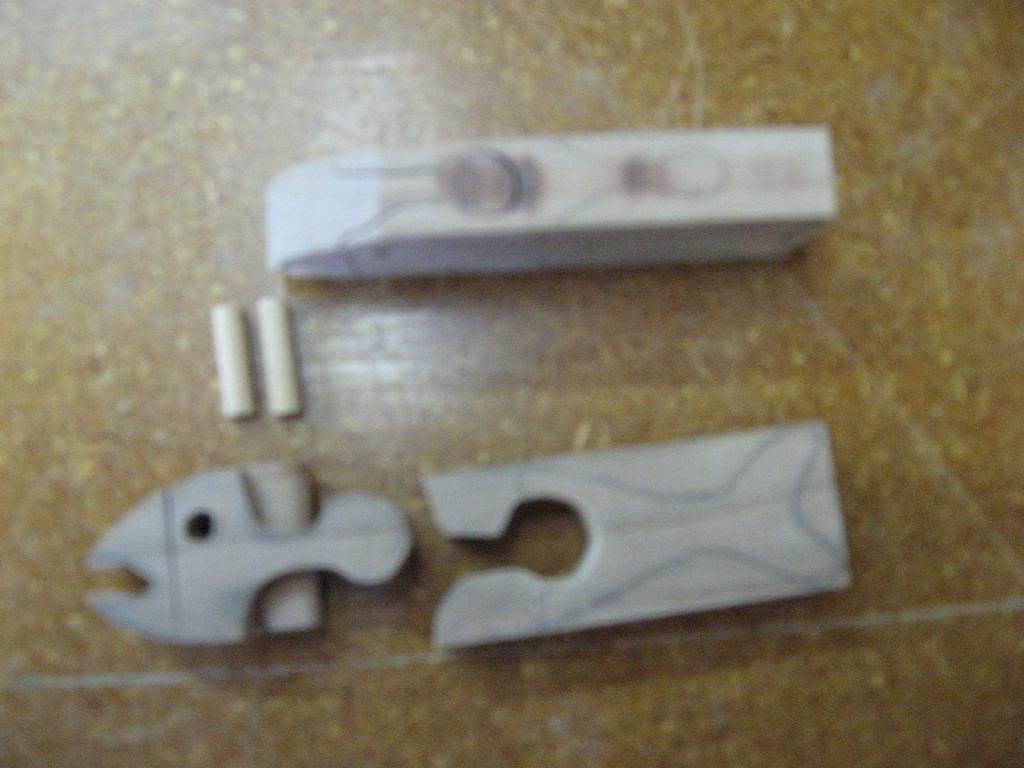
Cut the second puzzle shaped piece from the top. Again be sure to keep the side shape so that it traps the side piece.


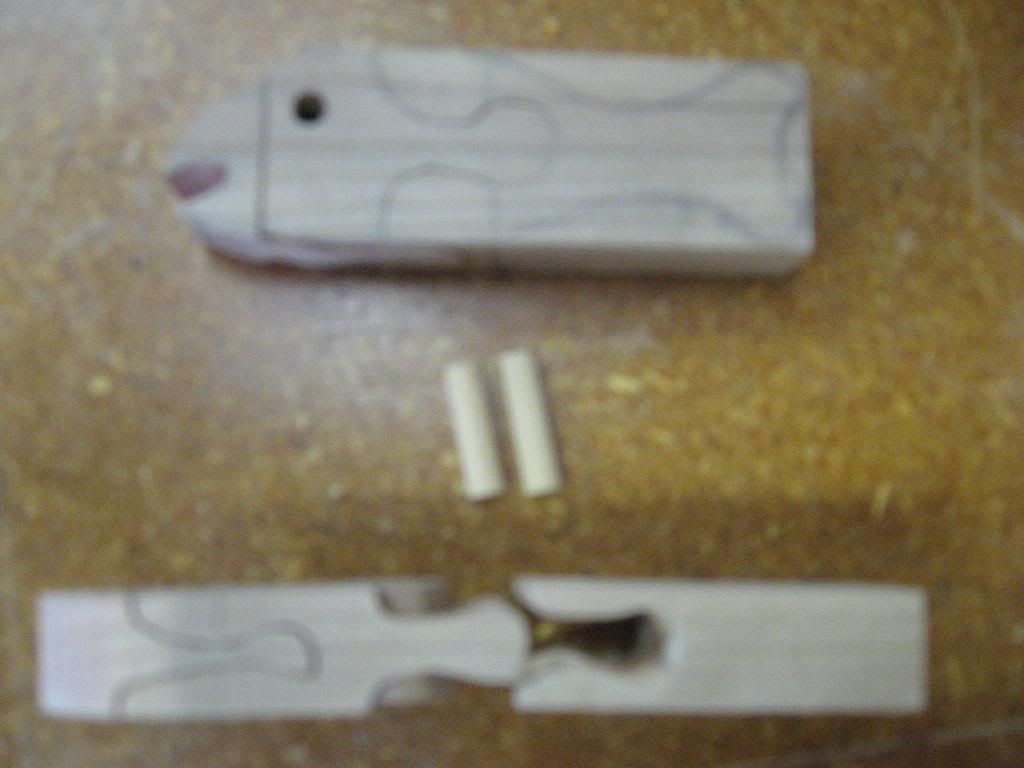
Once that is done, you can assemble the whole thing and use the peg to keep it together to cut the remainder of the fishes body and tail.  Then while it is all together, go ahead and knock off the corners of the head from the top, slim down the area at the tail and start sanding


SAND, SAND AND SAND SOME MORE!  :D :D :D   Shape to suit yourself. Finish as you want to, it's your fish now!  ;)


I forgot to mention to drill a hole in the tail to incorporate the keychain but, I figured that ya'll could guess that.

I hope this helps and encourages you to try new and different things in your scrollsawing.


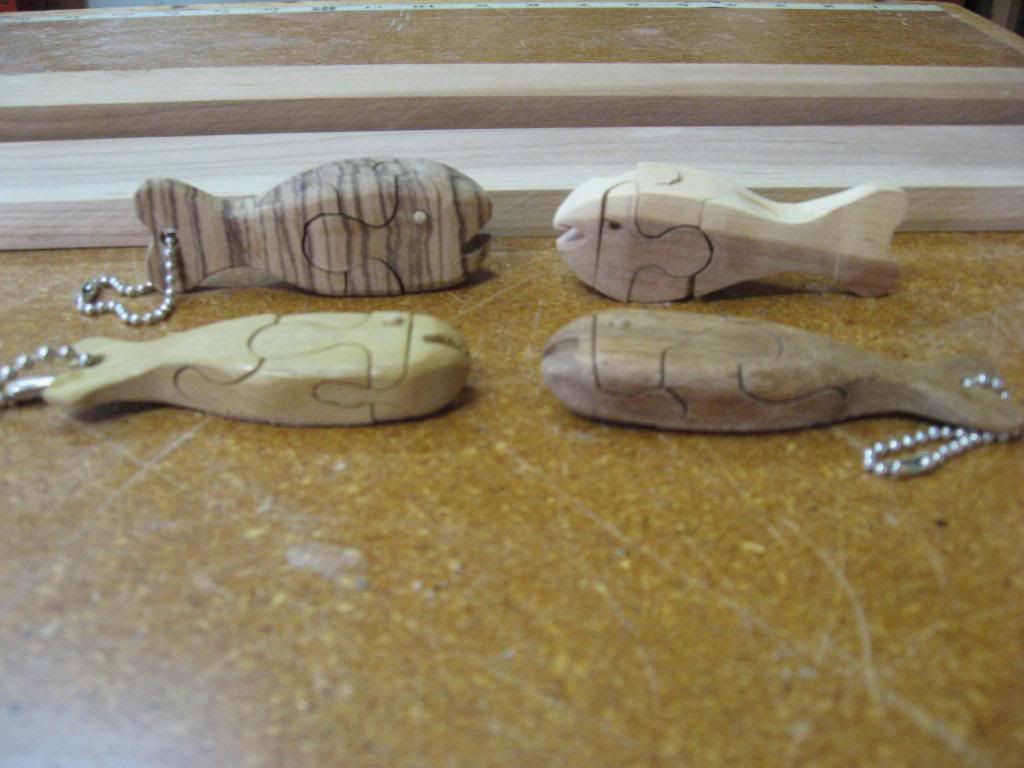
Upper left....Zebra wood.  Upper right....Cedar wood

Lower left ....Poplar wood.   Lower right ....Walnut 

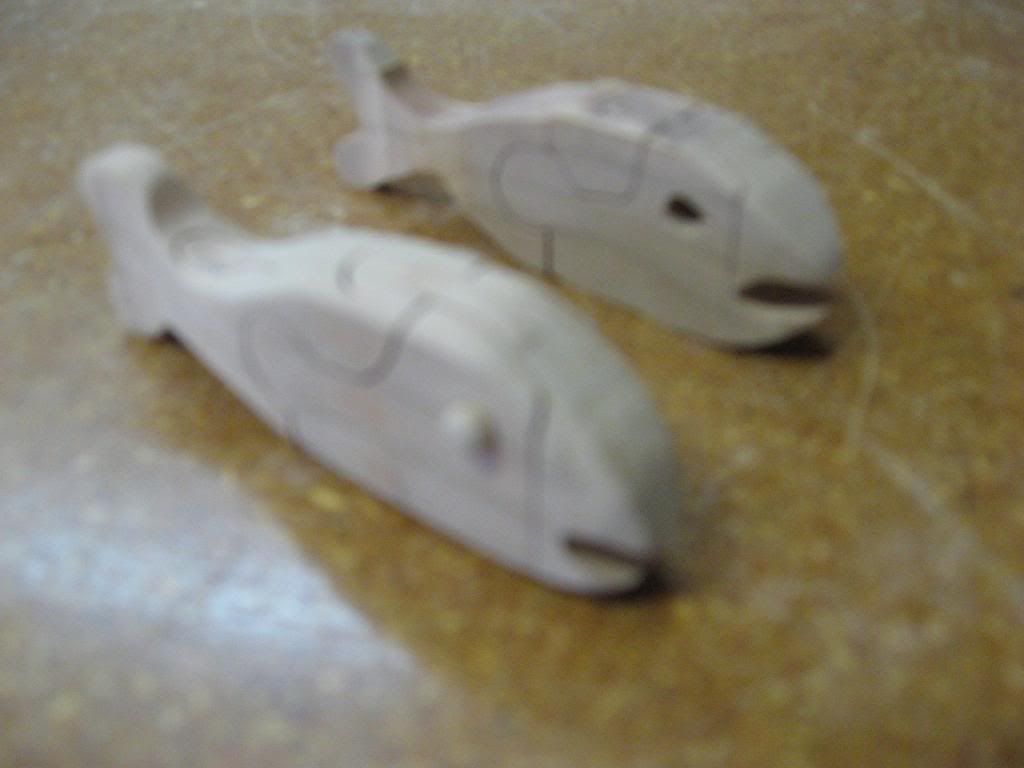
And the ones I cut for this tutorial were cut from Cherry wood.

Rog


366
Brag Forum / Re: An old project
« on: March 23, 2014, 09:20:22 pm »
OK guys and gals,
If there is that much interest in those stupid fishes, I'll try to post a tutorial.  :D ;)
I just made two of them today and took step by step photos (altho they are not that good of photos) and I will try to get them and a description of how and why into the tutorial section tomorrow.
I don't really remember where I found the original idea/plan/pattern. It was either on the internet or a magazine about seven years ago I would guess.

Rog     

367
Pattern Requests. / Re: Whale keychains
« on: March 23, 2014, 09:10:15 pm »
Im sorry Barry but, I do not have a pattern for it any longer. I found it some place on the internet a long time ago and as I said before, I just free hand draw it out right on the wood anymore.
I had hoped that someone else might have the pattern and tell us where they found it or maybe post a copy of it here online.
I have taken pictures of making a couple more today of the step by step way I do them. I'll try to put a bit of a tutorial down in the proper area in the next day or two.

Rog

368
Brag Forum / An old project
« on: March 23, 2014, 03:49:42 pm »
I was cleaning up some remote areas of the shop the other day and came across some old 3D, puzzle keychains that I made several years ago.
Some of you oldtimers might remember these and maybe even have a pattern for them. After making two or three of them, I didn't even need a pattern, I just drew on the wood with a pencil to make them.
Anyway, it might be interesting to some of the newer members and challenge them a bit. :)


If there is an interest in them, I might post a tutorial on how to cut them in the proper section of the forum.

Rog

369
The Coffee Shop / Re: Scam
« on: March 22, 2014, 05:31:49 pm »
I sometimes answer when I KNOW it it a telemarketer just to mess with them. For instance when they ask "How are you today" I say "Well my hip has been bothering me and my back is sore and I have this terrible cough, I'm out of the blue pills and my daughter won't answer her phone and my best friend died. How are you?"
After that, they don't know what to say so I just say "Thanks for calling and asking about me." Then I hang up.

Rog

370
General Scroll Saw Talk / Re: Making music
« on: March 20, 2014, 05:13:49 pm »
You might try some Tongue Drums, They are fairly simple to make.
And then there are Train whistles.


Rog

371
Brag Forum / Re: My Life Before I Got Into Woodworking
« on: March 17, 2014, 09:56:33 pm »
Good job Dustin!
I did a similar thing a few years ago. I used to race enduro Go Karts back in the 80's and had trophy's and plaques  all over the house and shop.
My wife got tired of dusting them and they took up so much room that I decided to get rid of them. I took off the little plates and kept them and my wife took the trophy's and donated them to Special Olympics. She just about filled the Ford van with boxes of trophy's and plaques. The people at Special Olympics were so happy to get them and after she carried in the third box full, they all came out to the van and helped her tote the rest of the boxes inside.  :D
They rebuild them and have new plates made at the trophy shop for awards at the Special Olympic events they have every year.

Rog

372
Pattern Requests. / Re: See Through Bird House
« on: March 17, 2014, 09:18:51 pm »


Which raises a question.  What sort of glue does one use to attach glass to wood?  I've never tried that before.  Unless you set it up some different way, it would be a weight-bearing joint.

Becky,
You would NOT glue glass to wood. You need to make a dado in the top, bottom and sides of the bird house to hold the glass. Much like a picture frame holds the glass in. Then the suction cups would be attached to the wood part or, maybe the glass depending on the style of suction cups.
Personally, I would suspend the bird house from above on a wire(s) attached to the wooden part of the bird house. Or a person could mount it on top of a pole planted in the ground near the side of the house.
Just don't forget that you need to be able to open up the birdhouse to clean it out after mating season for new residents next year.  ;)

Rog

373
Pattern Requests. / Re: See Through Bird House
« on: March 17, 2014, 07:06:24 pm »
I saw that somewhere too but, I don't think it was plexiglass.
If I remember right, they used a one way mirror or glass. Not sure where I would find one way glass but, I may try a local glass shop and ask about it. It would be a fun build.

Rog

PS. I must have seen it on the internet because I don't subscribe to any magazines.

374
Ask Steve a question. / Re: Wooden mugs
« on: March 16, 2014, 09:06:13 pm »
Please note the date on this original post. (Feb 16)
The question was answered in the "General Scroll Saw Talk" thread on Feb 17th.
Check it out.  ;D

Rog

375
Pattern Requests. / Re: Another glider pic
« on: March 16, 2014, 11:44:39 am »
Try this one.......


 :D :D :D :D
Sorry but, just couldn't help myself!  ;D
The devil made me do that!  ;D
Every time you mentioned "GLIDER" this was the first thing that came to my mind.  ::)

Rog

Pages: 1 ... 23 24 [25] 26 27 ... 98

SMF

Teknoromi