Show Posts

This section allows you to view all posts made by this member. Note that you can only see posts made in areas you currently have access to.


Messages - Rapid Roger

Pages: 1 ... 17 18 [19] 20 21 ... 98
271
General Scroll Saw Talk / Re: Font
« on: September 18, 2014, 10:59:24 am »
Sorry, can't help you with the font but, I don't think it would take much research to find it.

I saw the bible this morning too and it reminded me of a box/book that I made for a friend a few years ago. It sure ISN'T a bible but, it might give you some ideas for other box's/books for you to make and ways of making them.


http://s193.photobucket.com/user/rapidroger/library/War%20and%20Peace

I used Steve's idea of using birch plywood for the "pages" and walnut for the spine and covers. The "title" was inlayed purple heart.
I don't remember what font I used on this one either.  :P

Rog

272
The Coffee Shop / Re: Want to climb Mt Everest?
« on: September 16, 2014, 07:05:50 pm »
Please note that my name is NOT on the list of people who have climbed Mt Everest and, also note that it NEVER will be.

But, that is a cool video (in more ways than one).
Thanks for posting it.

Rog

273
Tutorials, Techniques and Tips / Re: Tips for cutting circles anyone?
« on: September 15, 2014, 10:10:13 am »
My suggestion, or, "The way I do it".......

I usually DRILL the inside circle to get a perfectly round hole. I use a forester drill bit in the drill press to get a nice, smooth hole with as little tear-out as possible. If I don't have one of the EXACT size, I drill using the next size smaller and file or sand the inside to the final dimension.
As for the outer circle, I use the scroll saw to cut just a bit OUTSIDE the line and then sand down to the final dimension.
Of course, it depends on what you are cutting the circle for and if it is a complete ring or maybe has something protruding to the inside or outside of it.
As for using JUST a scroll saw and, depending on the diameter of the circle, I cut just off of the line so that it can be sanded or otherwise worked down to final dimension and/or appear to be perfectly round. Just go slow, take your time, breathe, realize that NOTHING IS PERFICT, it just LOOKS that way!  ;D
At any rate, accept the fact that is going to take some sanding and hand work and it may not be exact but, it will LOOK GOOD to everyone else.  ;)

Rog 

274
General Scroll Saw Talk / Re: Done Scroll Sawing for a few days
« on: September 10, 2014, 07:05:00 pm »
Just goes to show you, "When all else fails, get a bigger hammer!".  ;D

Rog

275
The Coffee Shop / Re: Where are you?
« on: September 05, 2014, 10:18:48 am »
I was stationed at Kingsley Field, Klamath Falls, Ore. for four years back in the early 1960's.
The base sat on a 6 mile square "table top" of lava from all the surrounding old volcano's. It was so bad that the government had to import dirt just to grow grass, BUT I LOVED OREGON in general.  :)

Rog   

276
The Coffee Shop / Re: God's Humor!!!
« on: September 04, 2014, 09:30:38 pm »
My daughter once sent me a post card that said..."When God made man, she was only kidding around."  :)

Rog

277
The Coffee Shop / Re: Two old men
« on: August 29, 2014, 10:18:25 am »
Priorities seem to change with age don't they?   ;) ;D

Rog

278
General Scroll Saw Talk / Re: Scrolling and Finishing.... :+}
« on: August 28, 2014, 09:54:28 pm »
Danny,
I have used a concoction that I call "Rude and Crude". It consists of  1/4 mineral spirits, 1/4 BLO and 1/2 polyurethane all mixed together in a pint jar for the initial coat. I DO NOT soak the project, I wipe it on with a rag or paper towel. (or even a foam brush)
The BLO pops the grain, the poly seals the pores in the wood and the mineral spirits helps the drying time which is fairly fast (an hour or less).
This WILL NOT give you a shinny or glossy finish but it is a very good base coat.
Then I sand down the "fuzzes" with brown paper sack to get a really smooth finish. After that you can spray on (or use the wipe on type) a coat or two of polyurethane of the gloss of your choice.

I have given the recipe for this concoction before but, I must repeat.....To keep it fresh and not dry out, remember to wrap the threads of the jar with Teflon pipe sealer tape to keep it from sticking shut. Believe me, if you "glue" a jar lid on with poly you will NEVER get the lid off again! B.T.D T. and have the T shirt! (and three SEALED jars of Rude and Crude to prove that)  ;D ;D That is another reason that I don't recommend dipping or soaking the project, it drys fairly fast (Mineral spirits remember, is a solvent and evaporates quickly) and your mixture is useless when it gets as thick as honey. I guess you could add more mineral spirits to thin it out again.  I've never tried that out though.  :)

Rog   

279
Brag Forum / Re: Segmented bowl using the scroll saw
« on: August 27, 2014, 09:48:55 am »
Thanks for the technique. I didn't get what you meant by "no end grain" but I do now.
Your photo shows an added center plug (looks like Walnut). Was that needed to clean up the intersection of all those sections? Getting perfect alignment would be tricky.


You are quite right, it is very tricky to get everything to come to a point at the center of the blank. I did fairly well on the first try but then ended up scrapping the bowl later.
The second try was fair but not as perfect so I used a 1/2" plug cutter and cut two plugs out of walnut and drilled a 1/2" hole in the center of the bottom piece and plugged the hole from each side to hide my Boo-Boo. Trimmed the plugs and sanded flush and "Bob was my uncle!".  ;D ;D
I once heard that the sign of a good wood worker was the ability to hide the mistakes and make them look like a design element.  ;)
I'm working on a third bowl now and am having some trouble with the 15 degree angle cuts and getting things to fit into a 360 degree blank correctly. I scratched my bald  spot for awhile and then I finally came up with a "FIX" I think, we shall see. (clue...three 30 degree pieces = 90 degrees.)
Will post a photo if things come out like I hope they will.  :D

Rog 

280
Brag Forum / Segmented bowl using the scroll saw
« on: August 25, 2014, 12:00:18 pm »
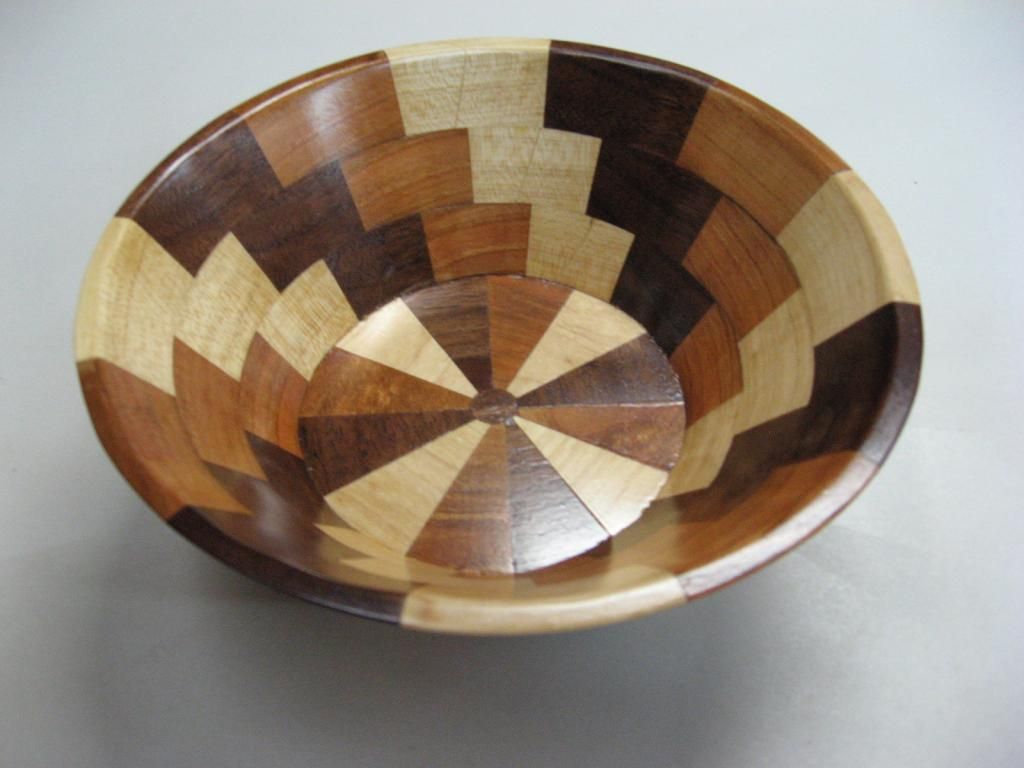
I really like making bowls and vases on the scroll saw and I just finished this one yesterday.
It is segmented using three different woods...Cherry, Maple and Walnut... and I used a "new to me" technique that I get into down in the "Tutorial, Technique and Tips"  section of this forum if you care to see it.
Actually, this is my second try (I'll do anything twice) the reason is that I had another idea that didn't work on the first one. I'll  give that idea another try too later.  ;D


The wood thickness is 3/4" and the bowl measures 3" tall  and 8" in diameter.

Keep making saw dust and don't be afraid to try new ides for your self.

Rog

PS I posted a segmented vase about two years ago using yet another (more common) way of cutting the segments. Note that my "new way" doesn't show ANY end grain in the bowl.

281
Tutorials, Techniques and Tips / Tute on segmented bowl
« on: August 25, 2014, 11:36:25 am »
I thought of a new way to cut the segments for a segmented bowl and thought I would share it with you.
For starters, I'll warn you the a table saw with a very accurate miter gauge is REQUIRED and even then, some practice cuts are necessary. Fifteen degrees is not a real common angle for most of us but, in order to get 30 degrees for the segments it is a MUST!
Hope you enjoy my "new way" of getting started. I like it because it doesn't need much wood and wood is a problem for all of us.


http://s193.photobucket.com/user/rapidroger/library/Segmented%20bowl-NEW%20WAY


Actually, I ended up trashing the bowl that is used for the step by step photos.  ( I had an "IDEA" that didn't work  on this one) But, as I always say "I'll do anything twice!" so, the finished product is my second try at the procedure. (I intend to try my "IDEA" again too.  ;D )

Rog

282
The Coffee Shop / Re: 36 second video
« on: August 21, 2014, 07:01:01 pm »
A few years ago (when I was still working) I was in a body shop and saw a car that had been beaten up by a guy with a baseball bat.
The car was totaled!
He did a real job on every panel and windows and lights, hood roof, trunk etc. Repair would have cost more than the car cost new.

Rog

283
General Scroll Saw Talk / Re: Thick Stack Cutting
« on: August 21, 2014, 06:28:31 pm »
YOU DON'T!  ::)

Ha Ha just kidding.  :D  It really is a problem. What I do generally is use glue and saw dust from one of the pieces of wood. Use the darker wood if that is where most of the hole is or the lighter wood on the other hand. I have been known to use a tooth pick and glue to fill the hole and then snap it off and sand down.
For the most part, people don't notice where the hole is but of course it stands out like a sore thumb to me. I try to drill the holes in a tighter area of the letter and vary the location around each letter as much as I can. For instance where I had a double letter (DD, RR or TT) I try NOT to put the hole in the same area of both letters.
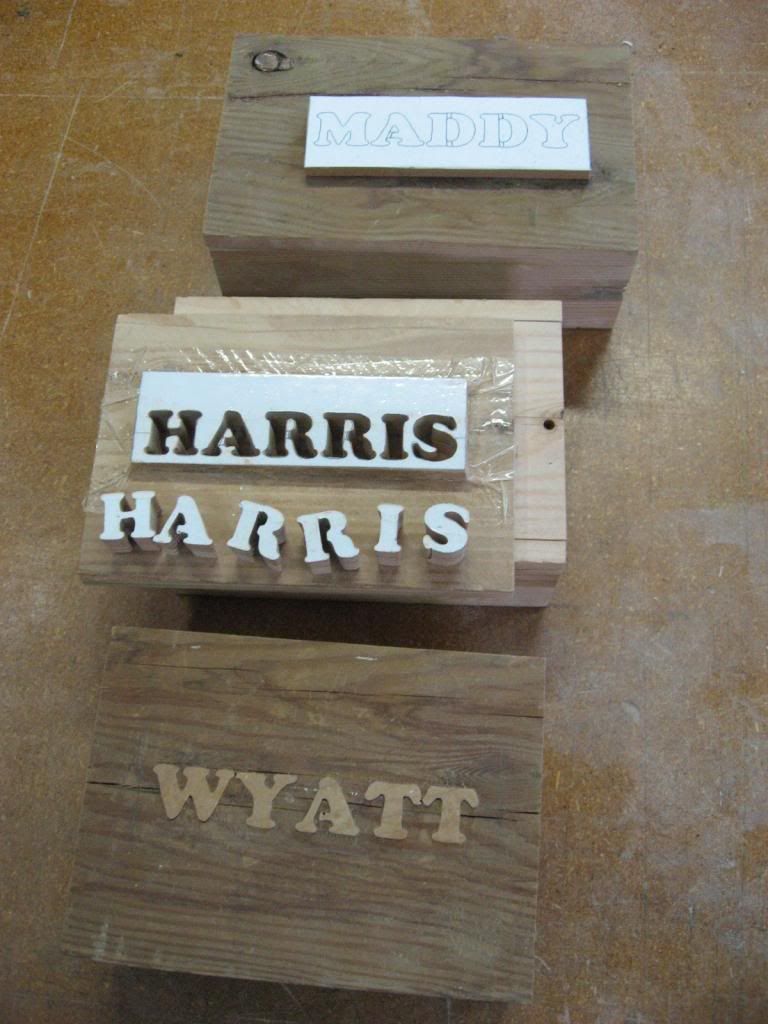
If you enlarge my photo, you will notice that I put the hole in "WYATT's" box top between the "W" and the "Y" and between the "T's".
See, I told you that they stand out like a sore thumb to me but, I'll bet you never noticed them before.  ;D 
Hope that helps.

Rog

284
General Scroll Saw Talk / Re: Thick Stack Cutting
« on: August 20, 2014, 11:36:35 am »
Actually, I cut 3/4" stock quite a bit. I generally use a #10 blade for thick wood. The ones I use are Olson's FR408TW- Thick Wood and have only 7 TPI. They are thicker too, .018 and .080 width. The fewer teeth help to clear the saw dust easier so it doesn't build up and get the wood as hot as fast as the "more tooth" blades do.
As for making an inlay fit tight and flush, you need to stack cut the two pieces at the same time and tilt the table a bit so that the top of the upper piece is a bit larger than the top of the lower piece and then it fits into the void like a plug.
As far as "How much do I tilt the table?" The only way to find out is to do some practice cuts using the same thickness of wood as the project and cut a few small circles or shapes.
Different thicknesses cause the table tilt to vary. I usually start with 3 degrees tilt and after a practice cut or two will change it by about 1/2 degree at a time. Either add a 1/2 degree or subtract a 1/2 degree depending on how the cuts fit together.
I did an inlay of names on box tops for the grandchildren's Christmas gifts using 3/8" thick material.


Thinner material will require a smaller blade and there for a different angle to the tilt too. I think I used a FD5 on this project.
Sometimes a picture is worth 1000 words.  ;)

Rog

285
When my jeans get to looking like that, my wife throws them out! I consider them just to be "broken in" and still have 100,000 miles left on them.
I don't however spend $1500.00 on jeans. Wood working tools yes but, clothing no!
Jeans and a T shirt are the uniform of the retired.

Rog

Pages: 1 ... 17 18 [19] 20 21 ... 98

SMF

Teknoromi